Introduction[]
Eventually you'll need other goods your home island can't provide, either due to lacking adequate fertility or lack of space, so you'll have to settle new islands for producing goods. Once this new production is up and running, you could manually transport the goods between islands, but Anno 1404 has a trade route system to allow you to automate the shipments. This guide will discuss how this trade route system works.
Overview[]
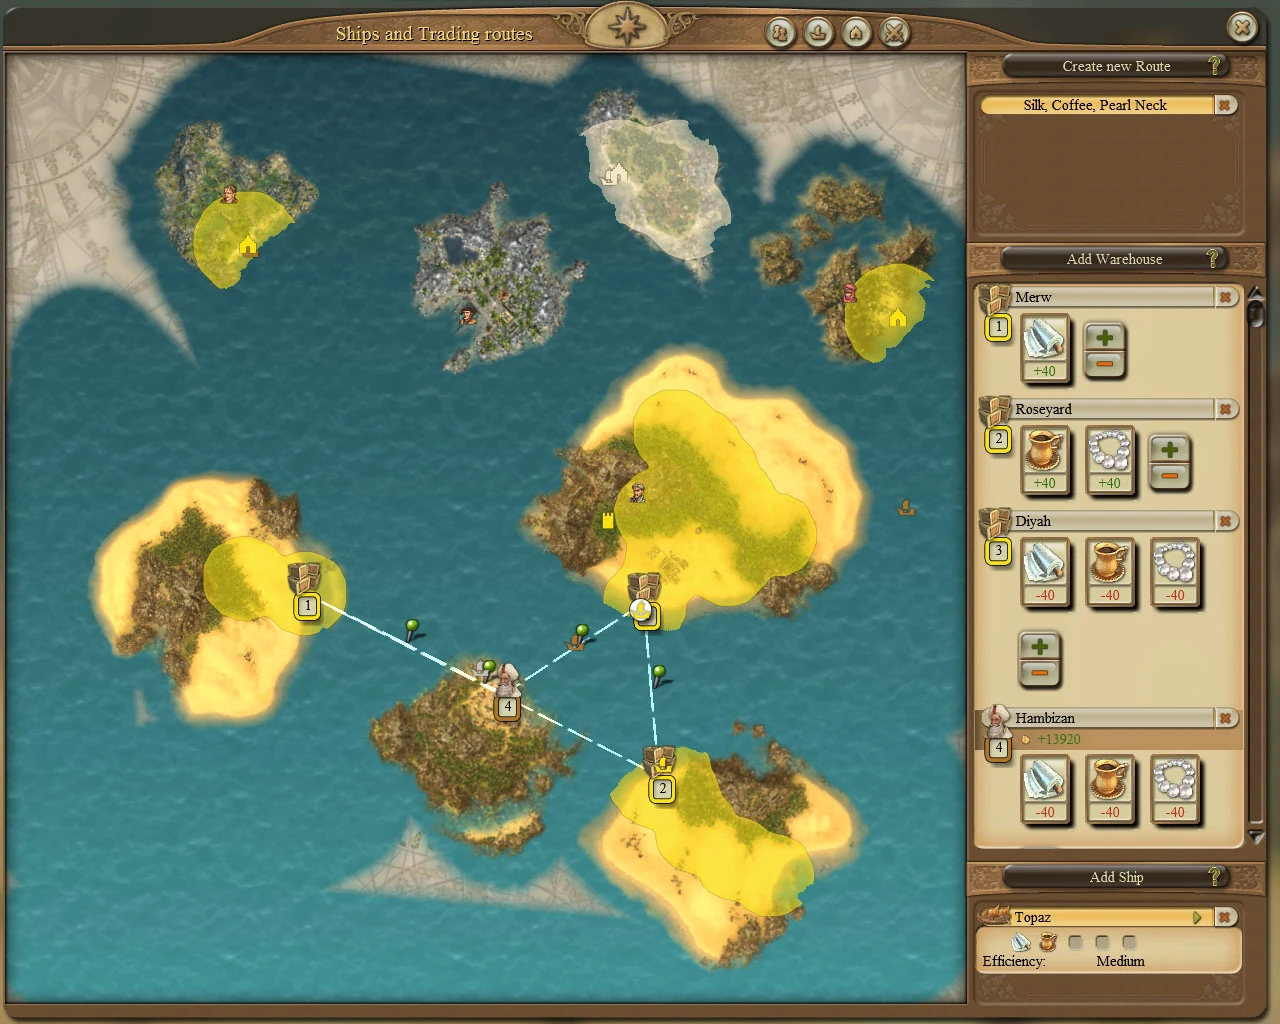
Screenshot of the Trade Route screen. This route has 4 waypoints.
Trading routes are managed in the Ships and Trading routes menu, displayed in the screenshot. This menu is accessed through either the button ![]() on the main icon bar, the button
on the main icon bar, the button ![]() in the info panel of a ship that is assigned to a trading route, or the key binding (F6 by default).
in the info panel of a ship that is assigned to a trading route, or the key binding (F6 by default).
The map initially shows the following information, coded by player color:
|
Most of this information can be filtered out using the buttons at the top of the window, to get a clearer view of your own empire.
Creating routes[]
The side bar to the right contains the interface for creating and modifying trade routes, from top to bottom:
- Create new Route button;
- List of existing routes;
- Add Warehouse button;
- List of waypoints and loading/unloading instructions for the currently selected route;
- Add Ship button;
- Information about ships assigned to the selected route: whether they are currently sailing the route, their cargo and efficiency.
To add a new route, you have to set up the following things:
- The name of the route;
Simply click the Create new Route button to add a new route to the list. You can click the route and edit the name, if you wish. Using descriptive route names (like the names of all goods transported) is very helpful; this makes it much easier to find a route you need to modify once you have a dozen or so trading routes.
- Which ports the route will visit;
Add waypoints to the route, either by clicking the Add Warehouse button and selecting from the list, or directly selecting the warehouse/harbour master's office location on the map. Waypoints are added and numbered in the order you select them.
- Which goods will be loaded/unloaded at each waypoint;
Initially, the instruction list for transferring cargo is empty for a new trading route. Click the + (load cargo) or - (unload) button to open the inventory menu of the corresponding warehouse, where you can select the goods that should be transferred. Loading onto the ship is shown in green text, for example +40, while unloading is in red: -40. Left-clicking a goods icon produces a slider that allows you to change the amount of goods and whether they are loaded or unloaded. Right-clicking removes the goods from the instruction list. Clicking the
 button to the right of the waypoint name removes the entire waypoint.
 - Which ship(s) will sail this route.
You can assign ships to a route either by clicking the Add Ship button and selecting one from the list, or clicking the ship's icon on the map. As soon as you have selected a ship, it will immediately drop what it was doing and head for the first warehouse in the list.
If you want to stop a ship from sailing a route, simply open up the route menu, select the route at the top left and then hit the ![]() button next to the ship that is assigned to that route. Once you do this, the ship will immediately stop sailing and wait for further instructions. Any cargo it has on board will still be available.
button next to the ship that is assigned to that route. Once you do this, the ship will immediately stop sailing and wait for further instructions. Any cargo it has on board will still be available.
Trading strategies[]
As your empire grows, so will the number and complexity of your trading routes. In the beginning, the production chains are short and you only need some small ships transferring a single type of goods to your Occidental and Oriental settlements. At higher civilization levels, more types and greater quantities of goods will need to be moved around and production chains are longer, often requiring the chain to be split across multiple islands. This requires more thoughtful planning, depending also on existing trading routes, geography and diplomacy.
In general it could be said that it is more efficient to transport intermediate or final products instead of their raw materials. For example, to make candlesticks you need hemp, beeswax, copper ore and coal. If you can contain the production of brass on one island and that of candles on another another, you remove the need of moving these raw materials around, which frees up cargo slots on your ships for other goods.
This is just a rule of thumb, however, since sometimes you cannot avoid transporting raw materials (like quartz), or taking up additional cargo holds may not matter because the route is not using all of its ships' holds anyway.
An efficient supply network on a large map will generally feature several smaller hubs (production islands) and spokes (supply lines). The hubs concentrate the production of several types of goods, for example bread, beer and books, receiving any resources not available (indigo in this case) from a spoke and sending the finished products to the settlement where they are needed. The main advantage is that the spokes can usually use small and cheap ships, while the large ships carrying the goods to your settlement can be loaded efficiently by providing multiple goods in large quantities. A spoke can be as simple as a route to a single island, but it could also be a chain of several islands or a circular route visiting a small cluster of islands. This system works best if the hub is centrally located with respect to its supply islands, reducing the total length of the spokes. A downside is that you can lose large quantities of goods at once if ships on route to the settlement are sunk; protect these well at times of war!
For a single good coming from a very remote island, a direct point-to-point route is usually more efficient.
General tips[]
- Try use routes only for products that are consumed continuously, such as "needs" goods to your settlements and resources to production hubs, because goods like construction materials will just pile up in the warehouses and the ship's holds if you do not use or sell enough of them. Use the islands' own resources to obtain construction materials as much as possible, and use your flagship or an extra trading ship to provide more whenever you are building new production chains. There are good exceptions of course, like if you cannot produce a certain material in your settlement, or you want to develop as quickly as possible against a hard opponent and need all the tools you can get.
- Always provide plenty of docking space (piers and/or harbour master's offices) at busy ports, so that merchants and your own ships never have to wait their turn.
- Put harbour master's offices at strategic locations to shorten the distance your ships have to travel. Merchants do not visit these, so this also reduces the traffic at your warehouse.
- Be careful when unloading and loading goods at the same port. If you want to load all the cargo holds of your ship, but the warehouse cannot store everything you wanted to unload, some of it will remain on board and occupy the hold you needed for the new goods. You can relieve this issue by selling an excess of this good or its processed product at the receiving warehouse or running some extra production, to make sure the goods can always be fully unloaded.
- Ensure that your trade routes from production islands transport enough "needs" goods away from it to avoid filling up its storage capacity. Not doing so means you may not adequately fulfil those needs while having plenty of production. You can use more than one cargo hold per product on your trade route, assign multiple ships to it, or divide the products into separate routes, whichever is more efficient.